Evilginx 2.4 - Gone Phishing
"Gone Phishing" 2.4 update to your favorite phishing framework is here. May the phishing season begin!

Welcome back everyone! I can expect everyone being quite hungry for Evilginx updates! I am happy to announce that the tool is still kicking.
It's been a while since I've released the last update. This blog tells me that version 2.3 was released on January 18th 2019. One and a half year is enough to collect some dust.
I'll make sure the wait was worth it.
First of all, I wanted to thank all you for invaluable support over these past years. I've learned about many of you using Evilginx on assessments and how it is providing you with results. Such feedback always warms my heart and pushes me to expand the project. It was an amazing experience to learn how you are using the tool and what direction you would like the tool to expand in. There were some great ideas introduced in your feedback and partially this update was released to address them.
I'd like to give out some honorable mentions to people who provided some quality contributions and who made this update happen:
>> GET EVILGINX HERE <<
Special Thanks!
Julio @juliocesarfort - For constantly proving to me and himself that the tool works (sometimes even too well)!
OJ Reeves @TheColonial - For constant great source of Australian positive energy and feedback and also for being always humble and a wholesome and awesome guy! Check out OJ's live hacking streams on Twitch.tv and pray you're not matched against him in Rocket League!
pry @pry0cc - For pouring me many cups of great ideas, which resulted in great solutions! Also check out his great tool axiom!
Jason Lang @curiousjack - For being able to bend Evilginx to his will and in turn gave me ideas on what features are missing and needed.
@an0nud4y - For sending that PR with amazingly well done phishlets, which inspired me to get back to Evilginx development.
Pepe Berba - For his incredible research and development of custom version of LastPass harvester! I still need to implement this incredible idea in future updates.
Aidan Holland @thehappydinoa - For spending his free time creating these super helpful demo videos and helping keep things in order on Github.
Luke Turvey @TurvSec - For featuring Evilginx and for creating high quality tutorial hacking videos on his Youtube channel
So, again - thank you very much and I hope this tool will stay relevant to your work for the years to come and may it bring you lots of pwnage! Just remember to let me know on Twitter via DM that you are using it and about any ideas you're having on how to expand it further!
Here is the list of upcoming changes:
2.4.0
- Feature: Create and set up pre-phish HTML templates for your campaigns. Create your HTML file and place
{lure_url_html}or{lure_url_js}in code to manage redirection to the phishing page with any form of user interaction. Command:lures edit <id> template <template> - Feature: Create customized hostnames for every phishing lure. Command:
lures edit <id> hostname <hostname>. - Feature: Support for routing connection via SOCKS5 and HTTP(S) proxies. Command:
proxy. - Feature: IP blacklist with automated IP address blacklisting and blocking on all or unauthorized requests. Command:
blacklist - Feature: Custom parameters can now be embedded encrypted in the phishing url. Command:
lures get-url <id> param1=value1 param2="value2 with spaces". - Feature: Requests to phishing urls can now be rejected if User-Agent of the visitor doesn't match the whitelist regular expression filter for given lure. Command:
lures edit <id> ua_filter <regexp> - List of custom parameters can now be imported directly from file (text, csv, json). Command:
lures get-url <id> import <params_file>. - Generated phishing urls can now be exported to file (text, csv, json). Command:
lures get-url <id> import <params_file> export <export_file> <text|csv|json>. - Fixed: Requesting LetsEncrypt certificates multiple times without restarting. Subsequent requests would result in "No embedded JWK in JWS header" error.
- Removed setting custom parameters in lures options. Parameters will now only be sent encoded with the phishing url.
- Added
with_paramsoption tosub_filterallowing to enable the sub_filter only when specific parameter was set with the phishing url. - Made command help screen easier to read.
- Improved autofill for
lures editcommands and switched positions of<id>and the variable name. - Increased the duration of whitelisting authorized connections for whole IP address from 15 seconds to 10 minutes.
I'll explain the most prominent new features coming in this update, starting with the most important feature of them all.
Pre-phish HTML Templates
First of all let's focus on what happens when Evilginx phishing link is clicked. It verifies that the URL path corresponds to a valid existing lure and immediately shows you proxied login page of the targeted website.
If that link is sent out into the internet, every web scanner can start analyzing it right away and eventually, if they do their job, they will identify and flag the phishing page.
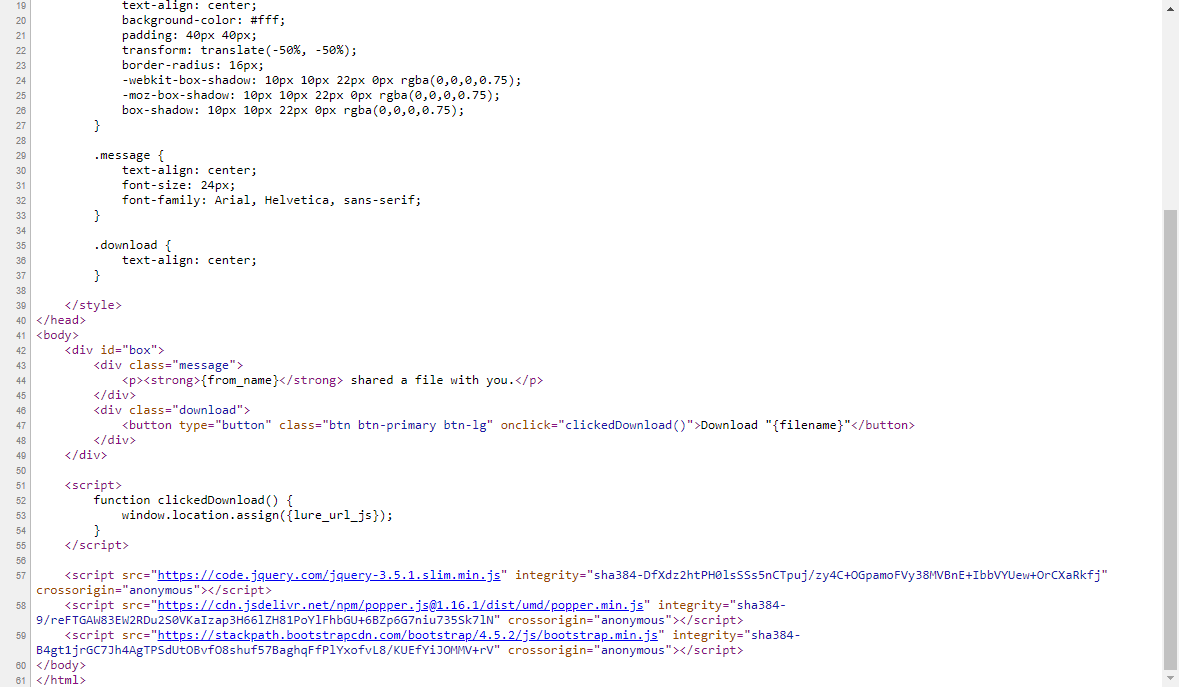
Pre-phish HTML templates add another step in, before the redirection to phishing page takes place. You can create your own HTML page, which will show up before anything else. On this page, you can decide how the visitor will be redirected to the phishing page.
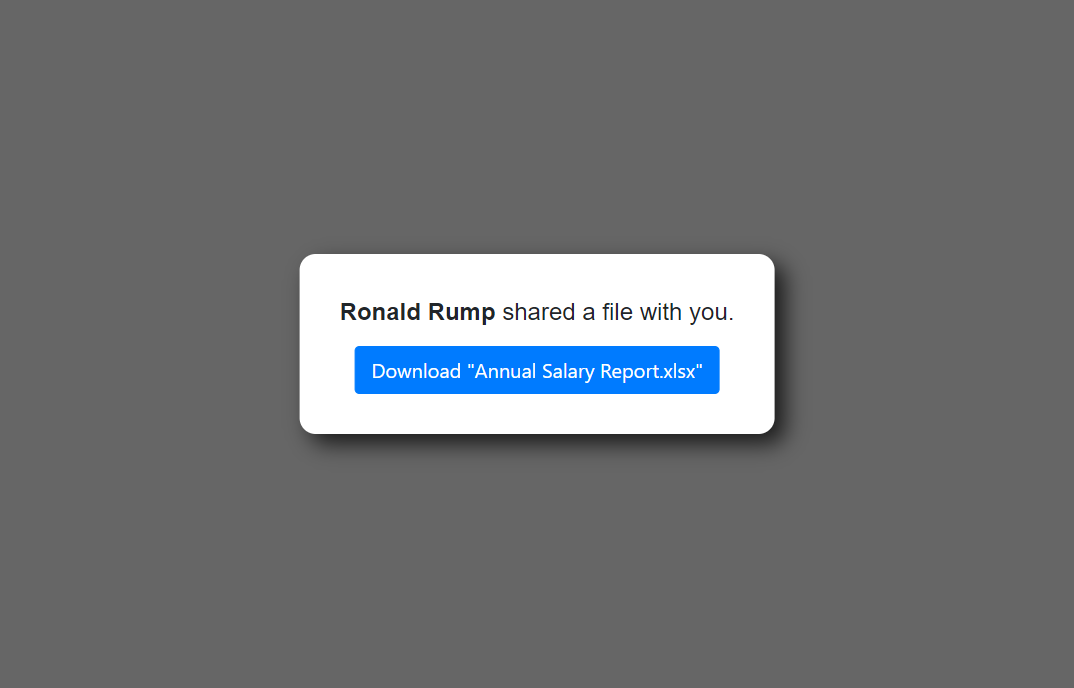
One idea would be to show up a "Loading" page with a spinner and have the page wait for 5 seconds before redirecting to the destination phishing page. Another one would be to combine it with some social engineering narration, showing the visitor a modal dialog of a file shared with them and the redirection would happen after visitor clicks the "Download" button.
Every HTML template supports customizable variables, which values can be delivered embedded with the phishing link (more info on that below).
There are also two variables which Evilginx will fill out on its own. These are:
{lure_url}: This will be substituted with an unquoted URL of the phishing page. This one is to be used inside your HTML code. Example output: https://your.phish.domain/path/to/phish
{lure_url_js}: This will be substituted with obfuscated quoted URL of the phishing page. Obfuscation is randomized with every page load. This one is to be used inside of your Javascript code. Example output:
'h' + 't' + 'tp' + 's:/' + '/' + 'c' + 'hec' + 'k.' + 't' + 'his' + '.ou' + 't' + '.fa' + 'k' + 'e' + '.' + 'co' + 'm' + '/se' + 'cur' + 'it' + 'y/' + 'c' + 'hec' + 'k?' + 'C' + '=g' + '3' + 'Ct' + 'p' + 'sA'The first variable can be used with <a href=...> HTML tags like so:
<a href="{lure_url}">Click here</a>While the second one should be used with your Javascript code:
window.location.assign({lure_url_js});If you want to use values coming from custom parameters, which will be delivered embedded with the phishing URL, put placeholders in your template with the parameter name surrounded by curly brackets: {parameter_name}
You can check out one of the sample HTML templates I released, here: download_example.html
Once you create your HTML template, you need to set it for any lure of your choosing. Remember to put your template file in /templates directory in the root Evilginx directory or somewhere else and run Evilginx by specifying the templates directory location with -t <templates_path> command line argument.
Set up templates for your lures using this command in Evilginx:
lures edit <id> templates <template_name>Custom Parameters in Phishing Links
In previous versions of Evilginx, you could set up custom parameters for every created lure. This didn't work well at all as you could only provide custom parameters hardcoded for one specific lure, since the parameter values were stored in database assigned to lure ID and were not dynamically delivered.
This is changing with this version. Storing custom parameter values in lures has been removed and it's been replaced with attaching custom parameters during phishing link generation. This allows for dynamic customization of parameters depending on who will receive the generated phishing link.
In the example template, mentioned above, there are two custom parameter placeholders used. You can specify {from_name} and {filename} to display a message who shared a file and the name of the file itself, which will be visible on the download button.
To generate a phishing link using these custom parameters, you'd do the following:
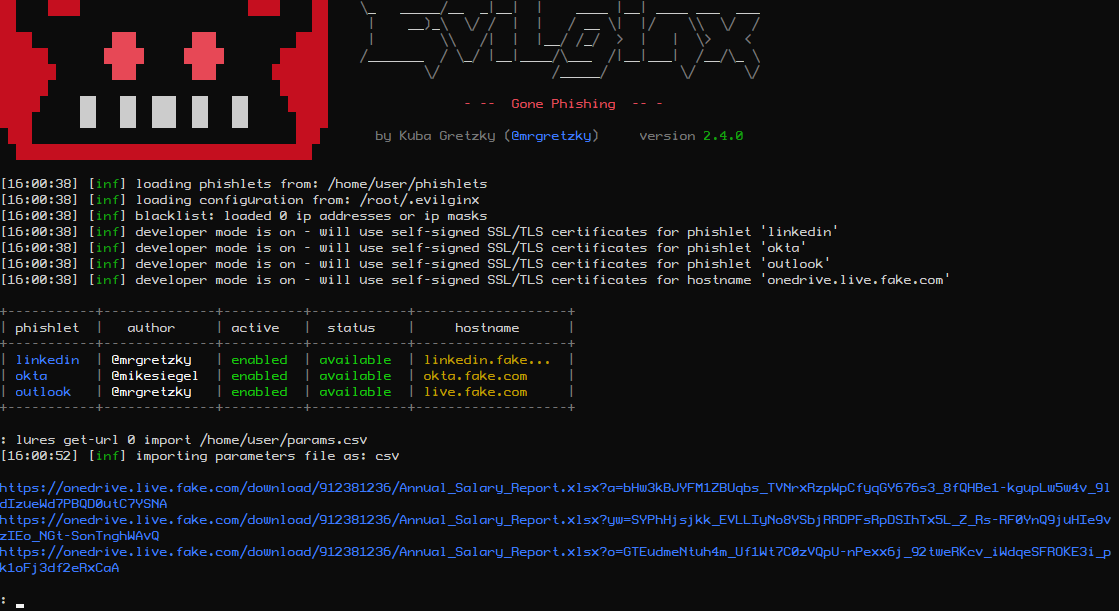
lures get-url 0 from_name="Ronald Rump" filename="Annual Salary Report.xlsx"Remember - quoting values is only required if you want to include spaces in parameter values. You can also escape quotes with \ e.g. variable1=with\"quote.
This will generate a link, which may look like this:
https://onedrive.live.fake.com/download/912381236/Annual_Salary_Report.xlsx?vLT=hvQzgP8bXoSOWvfYKkd5aMsvRgsLEXqL6_4SX3VYI95Jji1JPUnPDNmQUnsdSW9hPbpESDausLz2ckLb6MBTAs you can see both custom parameter values were embedded into a single GET parameter. The parameter name is randomly generated and its value consists of a random RC4 encryption key, checksum and a base64 encoded encrypted value of all embedded custom parameter. This ensures that the generated link is different every time, making it hard to write static detection signatures for. There is also a simple checksum mechanism implemented, which invalidates the delivered custom parameters if the link ever gets corrupted in transit.
Don't forget that custom parameters specified during phishing link generation will also apply to variable placeholders in your js_inject injected Javascript scripts in your phishlets.
It is important to note that you can change the name of the GET parameter, which holds the encrypted custom parameters. You can also add your own GET parameters to make the URL look how you want it. Evilginx is smart enough to go through all GET parameters and find the one which it can decrypt and load custom parameters from.
For example if you wanted to modify the URL generated above, it could look like this:
https://onedrive.live.fake.com/download/912381236/Annual_Salary_Report.xlsx?token=hvQzgP8bXoSOWvfYKkd5aMsvRgsLEXqL6_4SX3VYI95Jji1JPUnPDNmQUnsdSW9hPbpESDausLz2ckLb6MBT®ion=en-US&date=20200907&something=totally_irrelevant_get_parameterGenerating phishing links one by one is all fun until you need 200 of them, with each requiring different sets of custom parameters. Thankfully this update also got you covered.
You can now import custom parameters from file in text, CSV and JSON format and also export the generated links to text, CSV or JSON. You can also just print them on the screen if you want.
Custom parameters to be imported in text format would look the same way as you would type in the parameters after lures get-url command in Evilginx interface:
email=honeybunny@gmail.com name="Katelyn Wells"
email=muchdork@yahoo.com name="George Doh" delay=5000
email=i.r.john@hotmail.com name="John Cena"
If you wanted to use CSV format:
email,name,delay
honeybunny@gmail.com,"Katelyn Wells",
muchdork@yahoo.com,"George Doh",5000
i.r.john@hotmail.com,"John Cena",
And lastly JSON:
[
	{
		"email":"honeybunny@gmail.com",
		"name":"Katelyn Wells"
	},
	{
		"email":"muchdork@yahoo.com",
		"name":"George Doh",
		"delay":"5000"
	},
	{
		"email":"i.r.john@hotmail.com",
		"name":"John Cena"
	}
]
For import files, make sure to suffix a filename with file extension according to the data format you've decided to use, so .txt for text format, .csv for CSV format and .json for JSON.
Generating phishing links by importing custom parameters from file can be done as easily as:
lures get-url <id> import <import_file>Now if you also want to export the generated phishing links, you can do it with export parameter:
lures get-url <id> import <import_file> export <export_file> <text|csv|json>Last command parameter selects the output file format.
Custom Hostnames for Phishing Links
Normally if you generated a phishing URL from a given lure, it would use a hostname which would be a combination of your phishlet hostname and a primary subdomain assigned to your phishlet. During assessments, most of the time hostname doesn't matter much, but sometimes you may want to give it a more personalized feel to it.
That's why I wanted to do something about it and make the phishing hostname, for any lure, fully customizable. Since Evilginx is running its own DNS, it can successfully respond to any DNS A request coming its way.
So now instead of being forced to use a phishing hostname of e.g. www.linkedin.phishing.com, you can change it to whatever you want like this.is.totally.not.phishing.com. Of course this is a bad example, but it shows that you can go totally wild with the hostname customization and you're no longer constrained by pre-defined phishlet hostnames. Just remember that every custom hostname must end with the domain you set in the config.
You can change lure's hostname with a following command:
lures edit <id> hostname <your_hostname>After the change, you will notice that links generated with get-url will use the new hostname.
User-Agent Filtering
This is a feature some of you requested. It allows you to filter requests to your phishing link based on the originating User-Agent header. Just set an ua_filter option for any of your lures, as a whitelist regular expression, and only requests with matching User-Agent header will be authorized.
As an example, if you'd like only requests from iPhone or Android to go through, you'd set a filter like so:
lures edit <id> ua_filter ".*(Android|iPhone).*"HTTP & SOCKS5 Proxy Support
You can finally route the connection between Evilginx and targeted website through an external proxy.
This may be useful if you want the connections to specific website originate from a specific IP range or specific geographical region. It may also prove useful if you want to debug your Evilginx connection and inspect packets using Burp proxy.
You can check all available commands on how to set up your proxy by typing in:
help proxyMake sure to always restart Evilginx after you enable proxy mode, since it is the only surefire way to reset all already established connections.
IP Blacklist
If you don't want your Evilginx instance to be accessed from unwanted sources on the internet, you may want to add specific IPs or IP ranges to blacklist. You can always find the current blacklist file in:
~/.evilginx/blacklist.txtBy default automatic blacklist creation is disabled, but you can easily enable it using one of the following options:
blacklist unauthThis will automatically blacklist IPs of unauthorized requests. This includes all requests, which did not point to a valid URL specified by any of the created lures.
blacklist onThis will blacklist IP of EVERY incoming request, despite it being authorized or not, so use caution. This will effectively block access to any of your phishing links. You can use this option if you want to send out your phishing link and want to see if any online scanners pick it up.
If you want to add IP ranges manually to your blacklist file, you can do so by editing blacklist.txt file in any text editor and add the netmask to the IP:
134.123.0.0/16You can also freely add comments prepending them with semicolon:
; this is a comment
18.123.445.0/24 ;another comment
New with_params Option for Phishlets
You can now make any of your phishlet's sub_filter entries optional and have them kick in only if a specific custom parameter is delivered with the phishing link.
You may for example want to remove or replace some HTML content only if a custom parameter target_name is supplied with the phishing link. This may allow you to add some unique behavior to proxied websites. All sub_filters with that option will be ignored if specified custom parameter is not found.
You can add it like this:
sub_filters:
- {triggers_on: 'auth.website.com', orig_sub: 'auth', domain: 'website.com', search: '<body\s', replace: '<body style="visibility: hidden;" ', mimes: ['text/html'], with_params: ['target_name']}
This will hide the page's body only if target_name is specified. Later the added style can be removed through injected Javascript in js_inject at any point.
Quality of Life Updates
I've also included some minor updates. There are some improvements to Evilginx UI making it a bit more visually appealing. Fixed some bugs I found on the way and did some refactoring. All the changes are listed in the CHANGELOG above.
Epilogue
I'm glad Evilginx has become a go-to offensive software for red teamers to simulate phishing attacks. It shows that it is not being just a proof-of-concept toy, but a full-fledged tool, which brings reliability and results during pentests.
I hope some of you will start using the new templates feature. I welcome all quality HTML templates contributions to Evilginx repository!
If you have any ideas/feedback regarding Evilginx or you just want to say "Hi" and tell me what you think about it, do not hesitate to send me a DM on Twitter.
Also please don't ask me about phishlets targeting XYZ website as I will not provide you with any or help you create them. Evilginx is a framework and I leave the creation of phishlets to you. There are already plenty of examples available, which you can use to learn how to create your own.
Happy phishing!
>> GET EVILGINX HERE <<
Find me on Twitter: @mrgretzky
Email: kuba@breakdev.org