Pwndrop - Self-hosting Your Red Team Payloads
Pwndrop is a self-deployable file hosting service for red teamers, allowing to easily upload and share payloads over HTTP and WebDAV.

I have to admit, I took my sweet time to write this post and release this tool, but the time has finally come. I am finally ready to publish pwndrop, which has been in development for the last two years. Rewritten from scratch once (Angular.js was not a right choice) and stalled for multiple months due to busy times at work.
The timing for the release isn't ideal, but at least I hope using pwndrop can help you get through these tough weeks/months.
Also stay at home, don't eat bats and do not burn any 5G antennas.
If you want to jump straight in and grab the tool, follow this link to Github:
What is pwndrop?
Pwndrop is a self-deployable file hosting service for red teamers, allowing to easily upload and share payloads over HTTP and WebDAV.

If you've ever wasted a whole evening setting up a web server just to host a few files and get that .htaccess file redirection working, fear no more. Your future evenings are safe from being wasted again!
With pwndrop you can set up your own on-premise file server. The features are specifically tailored for red teamers, willing to host their payloads, but the tool can also be used as a normal file sharing service. All uploaded files are accessible via HTTP, HTTPS and WebDAV.
Before jumping into describing what features are present on release, I wanted to give away some information on the tool's development process.
Under the hood
For a long time I wanted a self-hosted Dropbox, which would allow me to easily upload and share files with custom URL paths. There is of course Python's SimpleHTTPServer, which has a decent fanbase, but I badly wanted something that would have a web UI with drag & drop interface and deployable with a single command. The idea was born. I knew I'd make a backend in GO, but I had no experience in using any of the modern frontend libraries. It was 2018 back then and I decided it will be a good opportunity to learn something new.
First came in an idea of using Angular.js, since it is a very robust and well supported framework. In the end, it turned out to be too bloated for my needs and the amount of things I had to learn to just to make a simple UI (I'm looking at you TypeScript) was staggering. I managed to get a proof of concept version working and then scratched the whole project to start anew, almost a year later.
Then in 2019, a really smart and creative red teamer Jared Haight @jaredhaight released his C2 framework FactionC2 at TROOPERS19. I immediately fell in love with the web UI he did and after chatting a bit with him, I learned he used Vue.js. Vue seemed to be lightweight, relatively new and already pretty popular, which made it a perfect choice. Thanks Jared for inspiration!
I bought Vue.js course at Udemy and in few weeks I was ready to go. If you want to make a tool with a web interface, do check out Vue as it may fit your needs as well.
For my own and your convenience I got rid of all of the npm + webpack clutter to slim down the project as much as possible. When I found out that a small project like pwndrop requires 1000MB of preinstalled packages through npm init, the decision to put the project on a diet was made. I wanted to simplify working with the project as much as possible and cut out the unnecessary middleware. Even using webpack requires learning a ton on how to configure it and I definitely didn't want to spend any extra time on that. Now the project doesn't take more than 70MB of precious hard drive space.
All in all, I've detached the frontend entirely from the build process, allowing the UI files to reside in their own folder, making them easily accessible for modifications and updates. The backend, on the other hand, is a single executable file, which installs itself and runs as a daemon in a background.
My main goal was to dumb down the installation process to the greatest extent and I'm pretty proud of the outcome. The whole project has ZERO dependencies and can be installed as easily as copying the precompiled files to your server and entering a single command to install and launch the server.
Let's now jump into the most important part - the features!
Features
Here is the list of features, which you can use from the get-go in the release version.
Drag & drop uploading of files
Easily drag & drop your files onto pwndrop admin panel to upload them.
Works on mobile
Since the UI is made with Bootstrap, I made sure it is responsive and looks good on every device.
Fun way to use pwndrop on your phone is to take photos with phone camera through the admin panel and they will be automatically uploaded to your server.
Share files over HTTP, HTTPS and even WebDAV
Best part of pwndrop is that it is not just an ordinary web server. My main focus was to support serving files also over WebDAV, which is used for pulling 2nd stage payloads through variety of different methods.
You can even use it with your l33t "UNC Path 0-days" ;)
In the future I plan to also add support for serving files over SMB. This will also allow to steal Net-NTLMv2 hashes from the machines making the request.
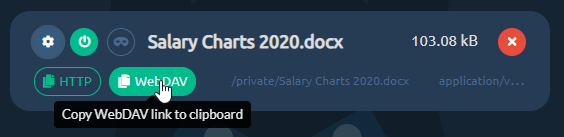
Click any of the "copy link" buttons to get a shareable link in your clipboard.
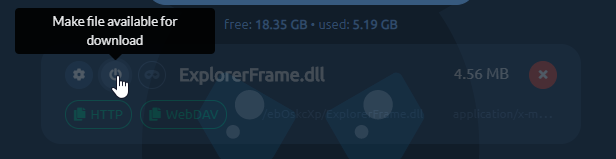
Enable and disable your file downloads
You can enable or disable file's ability to be downloaded, with a single click. Disabled files will return 404 or follow the pre-configured redirection when requested.
Set up facade files to return a different file from the same URL
Each uploaded file can be set up with a facade file, which will be served when a facade is enabled.
For example, you may want to share a link to a Word document with your custom macro payload, but you don't want your macro to be analyzed by online scanners as soon as you paste the link. To protect your payload, you can upload a facade clean document file under your payload file.
When facade mode is enabled all online scanners requesting the file, will receive your clean facade file. This can give you a brief window of evading detection. To have your link return the payload file, you need to manually disable facade mode.
Create custom URL paths without creating directories
You can set whatever URL path you want for your payloads and pwndrop will always return a file when that URL is reached. There is no need to put files into physical directories.
By default, the tool will put every uploaded file under a randomly generated subdirectory. You can easily change it uploaded file's settings.

URL redirects to spoof file extension
Let's say you want to have a shared link, pointing to /download/Salary Charts 2020.docx, but after the user clicks it it should download an HTA payload Salary Charts 2020.docx.hta instead.
Normally you'd have to write some custom .htaccess files to use with Apache's mod_rewrite or fight with nginx configuration files.
With pwndrop you just need to specify the URL path, the file should automatically redirect to.

I will describe the whole setup process in the Quickstart section below.
Change MIME types
In most web servers, web server decides what should be the MIME type of the downloaded file. This gives the web browser information what to do with a file once it is downloaded.
For example a file with text/plain MIME type will be treated as a simple text file and will be displayed in the browser window. The same text file with application/octet-stream MIME type will be treated as a binary file and the browser will save it to a file on disk.

This allows for some interesting manipulation, especially with MIME type confusion exploits.
You can find the list of common MIME types here.

Automatic retrieval of TLS certificates from LetsEncrypt
Once you install pwndrop and point your domain's DNS A records to it, the first attempted HTTPS connection to pwndrop will initiate an automatic retrieval of a TLS certificate from LetsEncrypt.
Secure connections should work out of the box, but do check the readme on Github to learn more about setting it up, especially if you want to use the tool locally or without a domain.
Password protected and hidden admin panel
I wanted to make sure that the admin panel of pwndrop is never visible to people who are not meant to see it. Being able to control the web server fully, I was able to completely lock down access to it. If the viewer's web browser does not have the proper authorization cookie, pwndrop will either redirect to predefined URL or return a 404.
In order to authorize your browser, you need to open a secret URL path on your pwndrop domain. The default path is /pwndrop and should be changed in the settings as soon as the tool is deployed to your server.
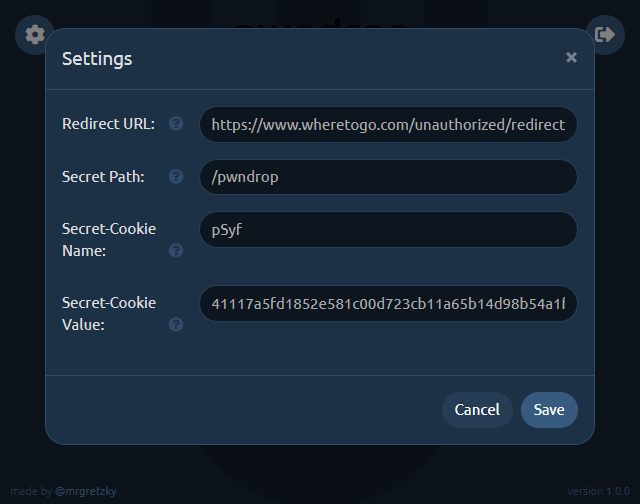
If you want to relock access to the admin panel, just change the Secret-Cookie name or value and you will need to visit the Secret-Path again, in order to regain access.
Quickstart
Now that I hope I've managed to highlight all of the features. I wanted to give you a rundown of how to set up your first uploaded file with a facade and redirection.
Goal: Host our payload.exe payload and disguise it as https://www.evilserver.com/uploads/MyResume.pdf shared link. The payload file will be delivered through redirection as MyResume.pdf.exe. The MyResume.pdf file will be set up as a facade file and it will be served as a legitimate PDF file if facade mode is enabled, in order to temporarily hide its true form from online scanners.
Here we go.
0. Deployment
If you don't yet have the server to deploy pwndrop to I highly recommend Digital Ocean. The cheapest $5/mo Debian 9 server with 25GB of storage space will work wonders for you. You can use my referral link to get an extra $100 to spend on your servers in 60 days for free.
I won't be covering the deployment process of pwndrop here on the blog as it may get outdated at some point. Instead check out the always up-to-date README with all the deployment instructions on Github.
If you are in a hurry, though, you can install pwndrop on Linux with a single command:
curl https://raw.githubusercontent.com/kgretzky/pwndrop/master/install_linux.sh | sudo bash1. Upload your payload executable file
Make sure you authorize your browser first, by opening: https://<yourdomain.com>/pwndrop
Then open https://<yourdomain.com> and follow the instructions on the screen to create your admin account.
IMPORTANT! Do not forget to change the Secret-Path from /pwndrop to something of your choice in the settings.
Use the Upload button or drag & drop payload.exe onto pwndrop to upload your payload file.
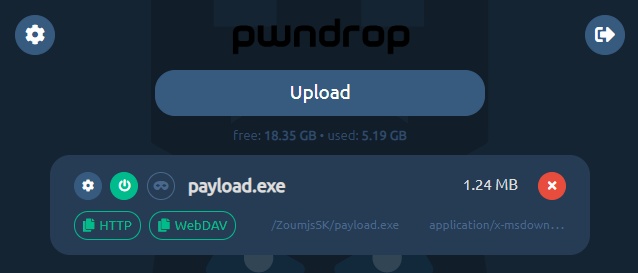
2. Upload your PDF facade file
Click the top-left cog icon on your newly uploaded file and the settings dialog will pop out.
Click the facade file upload area or directly drop MyResume.pdf file onto it.
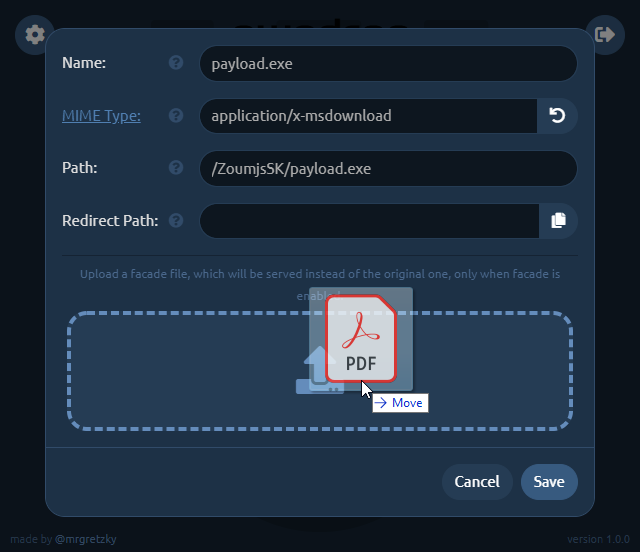
3. Set up redirection
Now you need to change the Path to what it should look like in your shared link. We want it to point to MyResume.pdf so change it to, say: /uploads/MyResume.pdf (you can choose whatever path you want).
Then click the Copy button at the right side of Redirect Path editbox and it will copy the contents of Path editbox to the editbox below.
Just add .exe to the copied path making it /uploads/MyResume.pdf.exe. This will be the path pwndrop redirects to, to serve the payload executable after the user clicks the shared link.
Keep in mind that the redirection will only happen when facade mode is disabled. When facade mode is enabled, pwndrop will serve the facade PDF file instead, not triggering any red flags.
We will also change the MIME type of the facade file, which will show you the power of this feature. While application/x-msdownload MIME type for PDF facade file is valid, the Chrome browser will initiate a download when the shared link is clicked. When you change the MIME type to application/pdf , though, Chrome will open the preview of the PDF file as it will know it is dealing with a PDF file.
Depending on what effect you want to achieve, either having the user download the PDF or have it previewed in the web browser, you can play with different options.
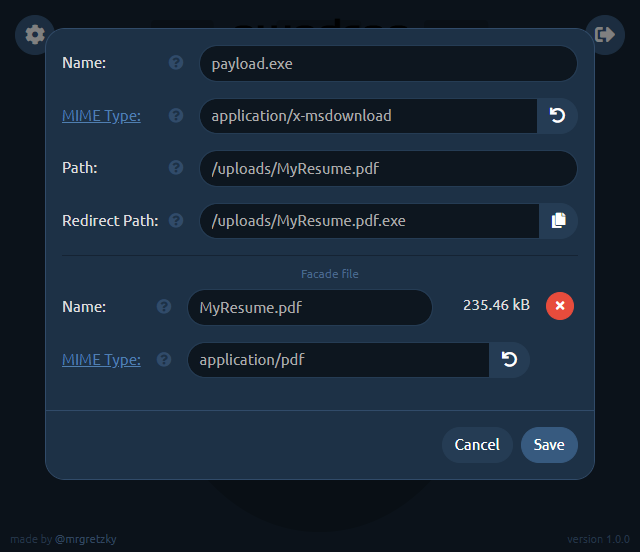
Don't forget to click Save once you're finished with setting up the file.
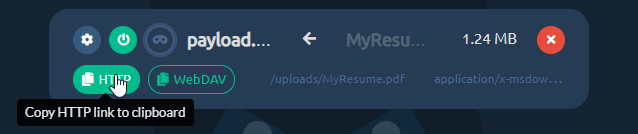
4. Sharing your file
Now you're done. You can get the HTTP shared link, by clicking the HTTP button. http:// or https:// prefix will be picked based on how you're currently browsing the admin panel. Similarly, if you click the WebDAV button, you will get the WebDAV link copied to your clipboard.
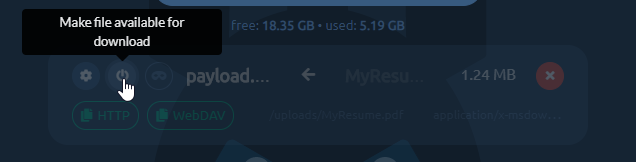
If you ever decide, you want to temporarily disable sharing for this file, just click the power button and it will effectively make the file hidden and links to it will stop working.
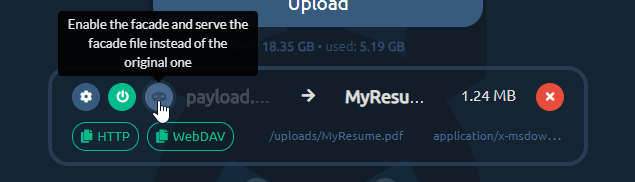
Next important thing is enabling the facade. Just click the third button from the left to flip the on/off switch to enable/disable facade mode. When the facade mode is enabled, pwndrop will serve the facade file, which you've uploaded for the given payload, instead of the original payload file. In our example it will deliver the PDF file instead of the payload executable.
Aaand that's it. Enjoy your first shared payload! Hope I've managed to not make the process too complex and that it was pretty easy to follow.
Future Development
I have a lot of ideas I want implemented into pwndrop, but instead of never releasing the tool and keep adding features, because "it is always not yet perfect", I've decided to release the tool as it is now. I will iteratively expand on it by adding new features from time to time.
So before you send me your feedback, check out what I plan to implement in near and far future. I really want to hear what features you'd like to see and how you'd want to use the tool.
Download Counter
This one should be implemented quite fast. It would add a download counter for each file, specifying the number of times the file is allowed to be downloaded. When the limit is reached, pwndrop will either serve a facade file or return file not found.
Download Tracker
This feature is a much needed one, but requires a bit of work. I want to add a separate view panel, which will display in real-time all download requests for every payload file. The log should contain the visitor's User-Agent, IP address and some additional metadata that can be gathered from the particular request.
File dropping with Javascript
There is a method to initiate a file download directly through Javascript executed on an HTML page. It is an effective method for bypassing request scanners of several EDRs.
The idea is that the whole payload file gets embedded into an HTML page as an encrypted blob, which is then decrypted in real-time and served as a download to the web browser. That way there is never a direct request made to a file resource with specific URL, meaning there is nothing to download and scan. EDRs would have to implement Javascript emulation engines in order to execute a dropper script in a sandbox and analyze the decrypted payload.
Conditional facades
At the moment, facade mode can only be enabled/disabled manually, but eventually I'd like this process to be somewhat automated. Pwndrop could check if the request is made with specific cookie, User-Agent or from targeted IP range and then decide whether to serve a payload file or a facade file instead.
Password protected downloads
Sometimes it is good to share a file, which downloads only after entering a valid password. This is the feature I'd also like to have in pwndrop. I'm not yet sure if it should be done with basic HTTP authentication or something custom. Let me know if you have any ideas.
The End (for now!)
This is only the end of this post, but definitely not the end of pwndrop's development. I'd really like to see how you, the red teamers, plan to use this tool and how it can aid you in managing your payloads.
I also hope that you can use this tool not only for work. I hope it helps you share any files you want with the people you want, without having to worry about privacy and/or security issues. Self-hosting is always the best way to go.
Expect future updates on this blog and if you have any feedback you want to share, do contact and follow me on Twitter @mrgretzky.
Get the latest version of pwndrop here:
Enjoy and I'm waiting for your feedback!